Sunday, 22 November 2015

Hair Charts - Contemporary Ideas

This has been the part of the unit that I've been looking forward too the most. This is the time that I came be so creative and push the limits of mixing modern day with classic old styles. Again, like the historical charts, I'm going to have to take into consideration that I'm working on a wig and not a human head. I believe this will affect some of my hair chart ideas and will limit me a lot to what I can create. Here are my ideas;
 
 
This is my first contemporary hair chart. It is a mixture of two punk hairstyles, a mohawk and a horse mane. As you can see, it looks like there are four balls attached to the head, these are in fact twisted and curled buns. For the prep, the hair will be placed in rollers to manipulate the hair, it will also give it some amazing curls. I'd then place some grips in the hair to make the buns link up and flow together as one. One the sides of the head, I would create two Dutch plaits that are raised up against the head. This is the bit that complicates things as Dutch plaits on a wig, wouldn't look very good because you'd clearly see all connections in the wig.

 
This is my second contemporary hair chart. I really like this idea and at the minute, this is the one that I'm wanting to create. The whole idea behind this is a twisted mohawk. Looking at it now, I can see that it slightly resembles a classic Danny Zuko hairstyles. This is something that I'm going to need to deal with when it comes to styling so it looks like a contemporary punk rather than a 1950s hairstyle. The sides will be slicked back against the head and work themselves into the mohawk. For the front, I want it to be large with lots of volume. It will involve a lot of backcombing and hairspray I believe.

 
My final contemporary hairstyle is more to do with curls and decoration, I want this to look pretty and modern. I would section the hair so the mohawk would be diagonal, to give a modern twist. I would have the hair on either side of the mohawk slicked against the head like my second idea chart and work it's way into the rolls. The face on image, shows the height and volume that I want to create on that top roll. The back of the head image shows that the four rolls on the back of the head are flat against it. I want it to resemble flowers and have this as more of a pretty punk than what they normally stand for, and that's ugliness.
 
As of right now, I have not chosen which idea to use because I like them all. I don't think I'll be creating my first idea look as I just don't see it working on a wig, this is something more of a human head. I'm torn between my two other ideas and I really don't know which one to create. I think I need to talk to some of my tutors first to see which is more appropriate, as I want it to be noticeable a punk look.


Hair Charts - Historical Ideas

For the historical side of the punk look, there isn't a lot that you can do because it's called a historical look for a reason. With these ideas, I have to take into consideration that I'm working on a wig, not a human head. This means that I'd have to do a hairstyle that would be suitable on a wig so that way, you don't see the connections where the synthetic wig connects. Here are my chart ideas;
 
 
This is my first historical look. It's a classic, straight mohawk. This was the most popular hairstyle to have back in the punk days of 70s/80s. This style will include all the hair, and it will finish in one point at the end of the hair. Normally, the hair on the sides would be shaven, this isn't possible on wig, so it will look a lot fuller than the historic ones. I really like this look because it's all about the structure and foundation of the style. As long as that stays up and is done well, the hair will stay and that's the main challenge of a punk hairstyle.

 
My second historical look is of Liberty Spikes. This was the second most popular hairstyle of the punk era. This involves spikes all over the head in random areas. The outcome of this hairstyle is really cool, I think. However, it can be hard to get all the hair into the points with it not looking thin. As amazing as it looks, I don't think I'll be creating this look on my wig as it would gape and show the connections within the wig too much.

 
This hairstyle is called a Duo-Hawk, and it is formed of two side mohawks. It's also known as a reverse mohawk, normally, the middle section of the hair would be shaven too. This style would have a very firm and straight middle parting, to resemble the shaven section of hair. This is my lest favourite look I think, as it reminds me more of horns than mohawks.
 
Out of all my historical looks, I went with the first option of the classic mohawk. I wanted to stay with the main historic look as I didn't want to stray from it being classed as historical.


Saturday, 21 November 2015

Blocking A Lace Wig

As you can guess, lace wigs are very fragile and need to be handled with a lot of care and time. In our lesson with Lottie, we learnt how to pin a galloon to a manikin head, helping to hold the lace wig we were working on in place.
 
Pinning the lace wig to the block is probably the most important thing to get right. You need to make sure that it's central and inline with the ears, eyes and were the forehead should start. Each wig is made for a certain person, so not every wig will fit everyone or every block. Sometimes you need to add some padding in between the wig and the block itself to get the right head shape. No lace wig is styled on the model, it's always done before on the block then placed on the model to finish off any last minute bits.
 
In order to pin the wig down properly, you need these things;
Galloon
Pins
Water & spray bottle
Padding
 
 
So firstly, you make sure that everything is central with your wig, otherwise once you've styled it and placed it on your model, it'll be wonky. You need to spray the lace with water and use the padding to smoothen it down against the block to ensure its straight and neat. The galloon is basically just a thin ribbon that you place around the edge of the lace on the wig. You need to also dampen this galloon before placing it again the lace. You need to find the middle of the lace, in line with where the nose would be, and start pinning the galloon in place from there. When putting the pins in, make sure that you place them in a zig zag style to ensure a very secure structure. Make sure you keep the hair out of the way otherwise it may get pinned down by accident. Pin all the way along the lace line, right to the ears and round. Then, with the spare galloon left over, bring it round to the front of the block and pin down, crossing over the two ends.  
 
 
Unfortunately, I forgot to take pictures when pinning down the galloon, as I was concentrating too much!  However, I do have this picture that shows what I've been talking about. Once the front lace is pinned in place, you need to get yourself some bigger and thicker pins. Place these larger pins at the bottom of the wig right in the bottom corners to hold the back of the wig in place. You will also need to place a few pins in the middle to hold the top in place. This is something that you need to judge on your own, if something feels loose, place a pin in it.


Creating The 80s Hair

I unfortunately missed the lesson in class when doing big 80s hair, due to an illness known as 'Freshers Flu', I do believe I may have died and come back to life that week! But thanks to the internet and talking to my friends, I know what went on during the lesson so I'm going to try to do these styles in the comfort of my own home and hope that they come out the way that they're supposed to. This may be tricky for me as I don't have the help of Lottie in lesson to guide me on my way like the others did, but I'll give it my best shot. We have to create two looks, one using heat, and one without. To do this, I split the hair in half so get the two looks done.

The first look is creating volume and wavy curls in the hair.

Equipment;
  • Mousse
  • Hairspray
  • Diffuser
  • Hairdryer
  • Afro comb
  • Water spray bottle
  • Paddle brush
Method;
  1. Spray the hair with the water until damp
  2. Add the mousse to the hair to give an even coverage
  3. Use the diffuser on the end of the hairdryer and work into the hair to scrunch it all together. This will start to create natural looking curls
  4. Use the afro comb to tease the hair to get the desired volume
  5. Repeat this with the fringe, and you're done.


The Jersey Girl
 
Equipment;
  • Pin tail comb
  • Sectioning clips
  • Curling tongs
  • Hairspray
  • Mousse
  • Paddle Brush
  • Hairdryer
  • Head scarf

Method;
  1. Create an of centre parting with the pin tail comb
  2. Section off a small section at the bottom of the hair and clip the rest out of the way
  3. Curl this section of the hair downwards and make sure to alternate this, repeat this over the whole back section of the hair
  4. For the front of the hair, curl away from the face. Make sure to hairspray over the curls slightly so it holds its shape better
  5. Leave to cool
  6. Once everything has cold down, get the pin tail comb and tease out the curls
  7. Backcomb sections of the hair starting at the roots and making your way out, to create the big hair that everyone in the 80s desired
  8. With the section at the front, use mousse along with a paddle brush and direct it in an upwards motion
  9. Keep repeating this, and hold a hairdryer onto this to get a firm hold from the heat
  10. To finish off your look, select a hair scarf of your choice and wrap it round the head leaving out the fringe slightly.

Punk Icons

Obviously there were a lot of punk icons in the 1970/1980s, for example, The Sex Pistols, The Clash & The Ramones...

...Who had the historical punk hair look of spikes and slightly messy looking hair. They did this as a sign of rebellion towards the higher authorities and also their parents. Punk was all about standing up for yourself and showing that to anyone you could, as you could probably guess, it was more of the youth that joined in on this epidemic.

I've been looking up on the internet what punks all about, and here are some of the interesting quotes that I found about it;

'The popularity of punk was, in effect, due to the fact that it made ugliness beautiful'  - Malcom McLaren

'Punk was defined by an attitude rather than a musical styles' - David Byrne

'I come from the home-grown punk ethic, where it doesn't matter if you can't play a note, it's about how you communicate' - Siobhan Fahey

Hiebert, P. and Hiebert, P. (2010). What Is Punk? 25 Definitions From People Who Should Know. [online] Flavorwire. Available at: http://flavorwire.com/99393/what-is-punk-25-definitions-from-people-who-should-know [Accessed 21 Nov. 2015].

You can see just from these three selected quotes, that the music was not at all the main thing. It was about how you looked, how you acted and, like Malcom McLaren says, it's about taking something ugly, and finding the beauty in it. I really like that quote because I think it says a lot about this era at the time along with their styles. I highly doubt anyone would go as far to say that the hairstyles, clothes and make-up they wore in the punk era were nice, but they were extremely creative and pushed the boundaries! Let's take a look at a few of these amazing hairstyle creations of punk.

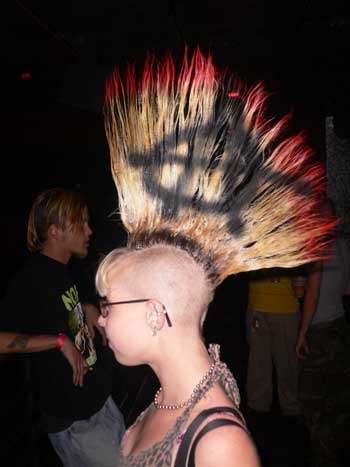
The Mohawk, was the true hairstyle of the punk movement. The wearer would shave his or her head except for a strip in the middle, for forehead to neck. Some people would let their hair grow to incredible lengths for the mohawk, and they would cement it straight up with any number of household liquids and products they could find. This would include such things as, eggs, glue, hairspray, and gel. They would try to get anything to spike up that mohawk!


Obviously with punk being about doing it yourself and not following the crowd, there were soon new variations of the mohawk. These included;

The Reverse Mohawk - Hair is shaved in the middle of the head opposed to the sides

The Chelseahawk - Mohawk with a fringe

The Deathhawk - Instead of sleek hair, it's teased

Another historical hairstyle from the punk era were the Liberty Spikes, they were like the Mohawk's brother in relation to hairstyles. This hairstyle was about consistency and care. Although it was meant to be about not giving a care in the world, a lot of precision and time goes into making Liberty Spikes. These are spikes that are all over the head, similar to the Mohawk, but all over. I've found from looking around online that these spikes would be evenly spaced out and with the same base width to make them all the same.


Over the years, people have lost interest in punk and moved onto new trends. However, there are some modern day versions of punk still in the music industry today, obviously they've changed slightly now from when they were first around about its' still got a modern twist of the classic punk look. For example, we can still see punk hairstyles worn by the likes of Green Day & Good Charlotte, both of which are music artists.


Here is a Good Charlotte music video still and you can see just how amazing the hairstyles are. They've all gone for classic punk looks, some with modern variations. You have the small Liberty Spikes on the far left, then a subtle Mohawk, then taking it very classical with large Liberty Spikes, and finish on the far right with a short wet, scruffy look. This would be slick down on the front or the fringe, then spiked and messy at the back.


Here are the band Green Day for a photoshoot. As you can see through their hairstyles, clothing and make-up, they are a modern punk band. On the far right, we have a neat and tamed classic mohawk, in the middle, you can see a scruffy and messy long hairstyles, and on the far left, you can slightly make out the correlation of spikes in the hair, however its not as noticeable as the hair is short.

D3vil89.altervista.org,. N.p., 2015. Web. 2 Dec. 2015.
Upload.wikimedia.org,. N.p., 2015. Web. 2 Dec. 2015.
Images.complex.com,. N.p., 2015. Web. 2 Dec. 2015.
Chohan, Jason. 'Chelsea-Hawk'. 
Hairstyles, Easy Hairstyles For Girls. N.p., 2015. Web. 2 Dec. 2015.
Deadthreads.co.uk,. N.p., 2015. Web. 2 Dec. 2015.
Lustyfashion.com,. N.p., 2015. Web. 2 Dec. 2015.
N.p., 2015. Web. 2 Dec. 2015.

Friday, 20 November 2015

Moustashe Work

After I finally finished knotting my moustache, the only thing left to do was shape and cut it into the appropriate length. This is what it looked like before I cut it and removed the pins and too it off my head.
 
 
Obviously, its far too long, but I love how accurate I got the shape of it. It really curls round nicely. To cut and shape the moustache, I had to use cutting scissors & and stove curling iron. The stove curling iron is something that I've come across before back in first year of uni but we never actually used it. I first had to cut the moustache into the desired length, although I did it slightly longer to start with so I could leave enough room to curl it. Helen showed me how to curl it properly and i'm surprised how well it came out for a first attempt! I haven't yet stuck it onto anyone but I have placed it against peoples faces to see what it looks like. For a distance, you couldn't even tell it was fake! Here is how it turned out;


Monday, 9 November 2015

Roller Work & 1940's Victory Roll

In our lesson with Lottie, we each selected our own lace wig that we wanted to work on, mine was long and ginger in colour. I decided to chose this wig because it's something that I haven't worked on before, when it comes to length and colour. I knew working with longer hair would be tricky because it takes a longer time and also its about manipulating the hair in the way that you want and it actually going that way. 


We first started by placing the front of the hair in heated rollers with an off centre parting. This was similar to Hollywood hair that we created, I needed to put three rollers on one side of the head and another one the other side of the parting all along the hairline. I then had to place two more rollers with the hair going away from the face on either side of the head. I clipped and pinned these in place to let them cool down. I then went onto barrel curl the back of the hair with a curler and pin in place. I had to then wait for it to all cool down. 
 

Once it had all cooled down, I then had to take out the rollers from the front. This made the hair look lovely, but I needed to brush it out to create the victory roll. I've never done this before so it was exciting for me to try out. 
 

I tried for about 20 minutes to get this victory roll right for me, there are a few different ways to do it. You can either have the rolls really blending with the hair as a curl or sometimes they can look more like horns. I wanted it too look more blended. Here are my attempts until I was happy with it. 
 
As you can see, my first attempt, I believe was too loose looking, almost like it's sagging down and not in place properly. So I then made it tighter and moved it up slightly. I preferred this, however, you can't see the back as I forgot to take a photo of it, but it just wouldn't sit right. I then did it again but this time, I took some hair out of the front and it made it sit a lot better. I then went on to take the barrel curls out the back of the hair. 
 

The next step from here was to brush out the hair with the paddle brush and then place it on my model. Obviously to do this, I had to put her hair up into pin curls and flatten the hair to the head and then place the cap over top. The difference between a lace wig and a synthetic wig is that you glue a lace wig down to the face. It's used more for theatrical work.
 
 
Up close, you can really see the lace but once it was stuck down with the spirit gum, you could hardly see it. I really enjoyed doing this, as did we all. We all got an experience of changing our entire looks just from putting on a wig. It really changes your whole overall look and skin tones and colours. I've been blonde before myself, so it wasn't a big shock and I believe I suited it rather well, but this wasn't the case with the ginger wig. I don't think I had the right facial tones for this to work on me. We all looked so different!